Art isn’t just about creativity—it’s about expression, pattern, balance, and texture. At our school, we recently celebrated our students’ artistic talents by creating a stunning wall display titled “Tile Designing and Radial Patterns.” This exhibition showcases a dynamic collection of square and circular artworks thoughtfully arranged within a geometric frame system designed by the teacher.
This blog post describes the concept, process, materials used, student involvement, and educational value behind this colorful art installation. Whether you’re an art teacher, school administrator, or simply a lover of classroom creativity, you’ll find plenty of inspiration in this project.
What Are Tile Designs and Radial Patterns?
Tile design refers to the creation of repeatable patterns in a square shape. These often reflect symmetry, geometry, and cultural inspiration, such as Islamic or Mediterranean tile art. In our project, students used square-shaped papers to design their own unique tiles, incorporating vibrant color combinations, various shapes, and symmetrical designs.
Radial patterns, on the other hand, radiate outward from a central point and are usually designed in a circular format. For example, think of mandalas or flowers with repeating petals. Unlike tile designs, this type of pattern promotes a more meditative and organized style.
As a result, students can focus on concepts like balance, proportion, and color theory. Additionally, working on radial designs helps increase their concentration and appreciation for harmony in nature and art. Overall, it is a creative and calming way to combine art with geometric understanding.
A Thoughtfully Designed Display Space
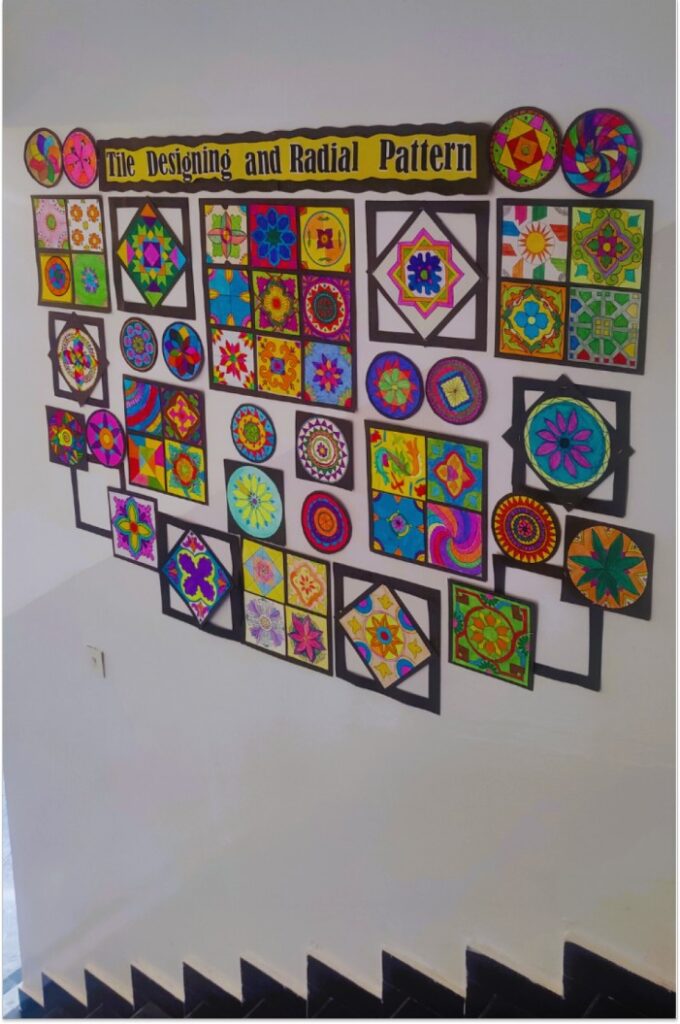
For the presentation, we wanted to go beyond the typical bulletin board or wall strip. The final display was set up on the stairwell wall, making it highly visible and eye-catching to anyone passing through the school.

Key Features of the Display:
- Geometric Frames: Using black chart paper, square and diamond frames were cut to provide structure to the tiles and radial artwork. These not only helped to visually position the work but also added an aesthetic dimension to the display.
- Arrangement: Square tiles and circular radial patterns were arranged alternately, ensuring visual rhythm and variety.
- Title Banner: The title of the display was “Tile Designing and Radial Patterns,” using bold, artistic lettering on a layered background to capture attention.
This careful arrangement encouraged students to take pride in their work and inspired all viewers—students, teachers, and visitors alike.
Student Involvement and Learning Outcomes
This wasn’t just an art project—it was an educational journey for the students. They learned about geometric principles, symmetry, radial balance, and the impact of cultural art.
Learning Objectives:
- Understand square (tile) and circular (radial) formats.
- Practice color balance and symmetry.
- Learn pattern-making techniques.
- Be patient and focused when creating detailed designs.
- Experience collaboration by collaborating in group displays.
Materials Used:
- Drawing sheets are cut into squares and circles.
- Sketching pencils and rulers.
- Colored pencils, markers, and oil pastels.
- Black chart paper for frame borders.
- Glue and scissors.
Each student created one or more pieces, either a tile design in a square shape or a radial pattern in a circle. Some even tried both. The results were a diverse and colorful collection of students’ interpretations.
Behind the Scenes: Teacher’s Role
As a teacher, I played the role of both guide and curator. First, I introduced the concepts of tile design and radial patterns through real-life examples and digital visuals. We practiced sketching some simple patterns together before the students began working on their final designs.
Then came planning the wall display. I used black construction paper to create geometric frames that complement the theme. The contrast between the dark frames and the colorful artwork made the display visually pop.
Additionally, I took a video of the final display and snapped a photo (see photo above) to document our efforts with parents, other teachers, and the online art education community.
The Impact of Displaying Student Work
Something is compelling about displaying student artwork in public spaces. It sends a message that creativity is valued and nurtured within the school community. Students walk in and see their work produced and celebrated—it creates a sense of pride and accomplishment.
Benefits of a Display Wall:
- Increases student confidence.
- Encourages peer-to-peer movement.
- Creates a welcoming school environment.
- Demonstrates the value of visual arts in education.
- Strengthens classroom community.
The project also helped students see art as more than a subject—it became a language of expression and connection.
Watch the Process Come to Life
See My Work in Action
Take a closer look at our vibrant wall display featuring student-made geometric masterpieces:
- 🎨 Square Tile Designs in Bold Colors
- 🌀 Radial Patterns Bursting from the Center
- 🖼️ Black Geometric Frames That Make Each Artwork Pop
Step into a colorful world of symmetry, creativity, and student pride as this stunning art wall comes to life—designed with heart, precision, and a passion for pattern!
Watch the magic unfold and get inspired to create your own classroom masterpiece!
Related Blog Posts You Might Like
FAQs – Tile Designing & Radial Pattern Wall Display
Q1: What is the difference between tile design and radial pattern?
Tile designs are typically square artwork with repeating or symmetrical patterns, often inspired by cultural tiles. Radial patterns are circular designs that radiate from a central point, resembling mandalas or flowers.
Q2: What materials are needed for this classroom art activity?
You will need square and circular drawing papers, pencils, rulers, colored markers or pastels, black chart paper for the frames, scissors, and glue.
Q3: What age group is this art project suitable for?
This project is great for elementary to middle school students (grades 2–7), depending on the level of complexity you assign to the pattern.
Q4: How can I display student artwork creatively in the classroom?
Use geometric frames made of black chart paper to mount each student’s art. Arrange them in a pattern on a bulletin board or hallway wall with a clear theme and title.
Q5: What are the educational benefits of this activity?
Students learn about symmetry, geometry, balance, pattern making, color theory, and artistic expression. It also builds confidence and encourages collaborative creativity.
Q6: How long does this activity take to complete?
Typically, this can be done in 2–3 class sessions—1 for sketching and planning, 1 for color and design, and 1 for display setup.
Q7: Can this display be adapted for other themes?
Absolutely! You can adapt the same display style to integrate other themes such as nature patterns, cultural art, seasons, or math art.
Final Thoughts
The “Tile Designing and Radial Patterns” wall display was more than just decoration—it was a celebration of learning, creativity, and teamwork. Each square and circle represents a student’s imagination and effort. The installation brightened up our school environment and served as a reminder that art has a powerful place in education.
Whether you’re looking for art project ideas, display inspiration, or just a colorful boost in your classroom, we hope this post sparks your next creative project.


Pingback: Tie-Dye Fabric Design Collection - 16 Unique Designs - 1thousandideas
It is perfect time to make some plans for the longer term and it’s time to be happy. I’ve read this publish and if I may just I desire to suggest you few fascinating things or suggestions. Perhaps you could write next articles referring to this article. I wish to learn even more issues about it!
Thank you so much for your thoughtful feedback! I’m glad you enjoyed it, and I’ll definitely keep your suggestion in mind for my next posts 😊
Pingback: Cubism Art by Kids: A Gallery-Style Wall Display - 1thousandideas
F*ckin’ amazing things here. I’m very happy to see your post. Thanks so much and i am taking a look forward to touch you. Will you kindly drop me a mail?
Pingback: Arabic Calligraphy Student Art Wall: - 1thousandideas
I’ll immediately grab your rss as I can’t in finding your email subscription hyperlink or e-newsletter service. Do you have any? Please let me realize in order that I may subscribe. Thanks.
Enjoyed looking at this, very good stuff, thanks.
You could definitely see your enthusiasm within the paintings you write. The world hopes for more passionate writers such as you who are not afraid to mention how they believe. At all times follow your heart.
Compelling read
Thanks for sharing excellent informations. Your web-site is so cool. I’m impressed by the details that you have on this website. It reveals how nicely you perceive this subject. Bookmarked this website page, will come back for more articles. You, my pal, ROCK! I found simply the info I already searched everywhere and just couldn’t come across. What an ideal web site.
Very interesting info !Perfect just what I was looking for!
You are a very intelligent individual!
Great insights
I have read a few good stuff here. Definitely price bookmarking for revisiting. I surprise how much attempt you put to make the sort of magnificent informative web site.
Great write-up, I¦m regular visitor of one¦s website, maintain up the nice operate, and It’s going to be a regular visitor for a long time.
I appreciate, cause I found exactly what I was looking for. You have ended my four day long hunt! God Bless you man. Have a great day. Bye
Great remarkable things here. I’m very glad to peer your article. Thanks so much and i’m looking ahead to touch you. Will you please drop me a mail?
very good submit, i definitely love this web site, carry on it
Heya i am for the primary time here. I came across this board and I find It really helpful & it helped me out a lot. I am hoping to present something back and aid others like you aided me.